In this post I show the basic commands for the openvswitch. You should have at least openvswitch 1.9 installed. This is the case, if you are running Ubuntu 13.04.
Preparation
In this blog, I show more than the basic commands. We use Linux network namespaces to show also the usage on the ip layer. The first step is to create two linux network namespaces (you must be root):
# create two network namespaces
ip netns add ns1
ip netns add ns2

# bring up the loopback interfaces of the namespaces
ip netns exec ns1 ip link set dev lo up
ip netns exec ns2 ip link set dev lo up
Next, we need three console sessions. One for each network namespace (use ip netns exec ns <x> bash to get into the namespace) and one for the non namespace config. I recommend, that you change the prompt for each session – it helps a lot, that you always knows, where you are.
#
# MAIN bash
#
export PS1="Main>"
#
# Console for Network Namespace ns1
#
ip netns exec ns1 bash
export PS1="NS 1>"
#
# Console in Network Namespace ns2
#
ip netns exec ns2 bash
export PS1="NS 2>"
Create a Switch (bridge)
The next step is to create a new virtual switch (or bridge). Use the following command in the Main console:
# create a new virtual switch
ovs-vsctl add-br testsw1

# check using
ovs-vsctl show

# the output will look like
9ddae96d-0cc4-4c17-98c2-7ffe3f4f6226             <==== this is the UUID of the running openvswitch
    Bridge testsw1                               <==== this is a running virtual switch instance
        Port testsw1
            Interface testsw1                    <==== By default, each virtual switch gets an internal interface
                type: internal                         internal interface == this is a interface seen by Linux
    ovs_version: "1.9.0"                         <==== the version of the openvswitch software running
By default, each virtual switch (=bridge), which has been created, gets one „internal port“ assigned. These internal ports are seen by the Linux OS. Type „ip link“ in the Main console and you get:
19: testsw1: <BROADCAST,MULTICAST> mtu 1500 qdisc noop state DOWN mode DEFAULT
    link/ether ae:fd:bb:27:2b:43 brd ff:ff:ff:ff:ff:ff
You can use this interface in the same way as all other Linux interfaces. Assign IP addresses to it or put IP access lists on it (iptables). We will ignore this interface.
An openvswitch bridge is not only a simple bridge, it’s a full blown software switch with
- 4 k Vlans – nothing to do to create them – they are just there
- it’s own MAC table
Create two ports in the bridge
The next step is to create two ports in the switch testsw1 and assign these to the two network namespaces. Run this in the Main console.
# create an internal ovs port
ovs-vsctl add-port testsw1 ns1iface1 -- set Interface ns1iface1 type=internal
# attach it to namespace
ip link set ns1iface1 netns ns1

# create an internal ovs port
ovs-vsctl add-port testsw1 ns2iface1 -- set Interface ns2iface1 type=internal
# attach it to namespace
ip link set ns2iface1 netns ns2
Check now in the Main console the openvswitch:
# show all switches
ovs-vsctl show

    Bridge "testsw1"
        Port "ns2iface1"
            Interface "ns2iface1"
                type: internal
        Port "testsw1"
            Interface "testsw1"
                type: internal
        Port "ns1iface1"
            Interface "ns1iface1"
                type: internal
We see the two ports in the list. A shorter command to list only the ports is
# list all ports of a bridge - here testsw1
ovs-vsctl list-ports testsw1
ns1iface1
ns2iface1
Now look into the namespace windows. Type ip link in both windows and the new interfaces appeared.
In ns1:
ip l
1: lo: <LOOPBACK,UP,LOWER_UP> mtu 65536 qdisc noqueue state UNKNOWN mode DEFAULT
    link/loopback 00:00:00:00:00:00 brd 00:00:00:00:00:00
20: ns1iface1: <BROADCAST,MULTICAST> mtu 1500 qdisc noop state DOWN mode DEFAULT
    link/ether 5e:e7:51:a5:10:55 brd ff:ff:ff:ff:ff:ff
#
# bring up ns1iface1
#
ip link set dev ns1iface1 up
#
# assign an ip address
#
ip addr add dev ns1iface1 10.0.0.1/24
In ns2:
ip l
1: lo: <LOOPBACK,UP,LOWER_UP> mtu 65536 qdisc noqueue state UNKNOWN mode DEFAULT
    link/loopback 00:00:00:00:00:00 brd 00:00:00:00:00:00
21: ns2iface1: <BROADCAST,MULTICAST> mtu 1500 qdisc noop state DOWN mode DEFAULT
    link/ether 8a:42:b3:91:db:c2 brd ff:ff:ff:ff:ff:ff
#
# bring up ns2iface1
#
ip link set dev ns2iface1 up
#
# assign an ip address
#
ip addr add dev ns2iface1 10.0.0.2/24
Now it should be possible to ping the other side.
In the Main console check the MAC address table of testsw1:
#
# list all mac addresses of testsw1 and the ports where the MAC addresses are located
#
ovs-appctl fdb/show testsw1
 port  VLAN  MAC                Age
    1     0  5e:e7:51:a5:10:55   58
    2     0  8a:42:b3:91:db:c2   58
The MAC addresses match those of the interfaces, we previously created. You might notice, that both MAC addresses are attached to Vlan 0. So – what is Vlan 0?
By default, ALL ports/interfaces, which are created on the openvswitch are able to transport dot1q tagged traffic unless there is a restriction added when the port is created. We made no restriction about this when we created the ports. Since both ip interfaces used in the network namespaces do not send dot1q tagged traffic, the openvswitch places this traffic in Vlan 0.
This Vlan 0 means: the openvswitch got untagged traffic on a link, where dot1q transport is enabled.
Create a dot1q tagged link
Now we create a dot1q tagged link in both network namespaces on top of the existing link. the command to do this is ip.
Example for network namespace ns1.
#
# create a Vlan subinterface on a interface
#
# here (example with the interface in namespace ns1)
# Vlan tag: 22
#
ip link add link ns1iface1 name ns1iface1.22 type vlan id 22
#
# it's a good practice to code the vlan number and the interface in the interface name for the new interface
#
# check the existing interfaces using ip link
#
NS 1>ip l
1: lo: <LOOPBACK,UP,LOWER_UP> mtu 65536 qdisc noqueue state UNKNOWN mode DEFAULT
    link/loopback 00:00:00:00:00:00 brd 00:00:00:00:00:00
2: ns1iface1.22@ns1iface1: <BROADCAST,MULTICAST> mtu 1500 qdisc noop state DOWN mode DEFAULT
    link/ether 5e:e7:51:a5:10:55 brd ff:ff:ff:ff:ff:ff
20: ns1iface1: <BROADCAST,MULTICAST,UP,LOWER_UP> mtu 1500 qdisc noqueue state UNKNOWN mode DEFAULT
    link/ether 5e:e7:51:a5:10:55 brd ff:ff:ff:ff:ff:ff
Do the same for network namespace ns2 (do not forget to change the interface name!)
Then bring the interface up and assign an ip address.
ns1 and ns2:
#
#### N S 1 ######
#
# bring the interface up
ip link set dev ns1iface1.22 up
#
# assign an ip address
ip addr add dev ns1iface1.22 10.1.0.1/24
#
#### N S 2 ######
#
# bring the interface up
ip link set dev ns1iface1.22 up
#
# assign an ip address
ip addr add dev ns1iface1.22 10.1.0.1/24
#
#### N S 2 #####
#
# ping the other side (from ns2 to ns1) in vlan 22
ping 10.1.0.1
#
#### N S 1 ######
#
# ping the other side (from ns1 to ns2) on the untagged link
ping 10.1.0.2
Look now on the MAC table of the ovenvswitch in the Main window:
ovs-appctl fdb/show testsw1
 port  VLAN  MAC                Age
    1    22  5e:e7:51:a5:10:55   87
    2    22  8a:42:b3:91:db:c2   87
    2     0  8a:42:b3:91:db:c2    1
    1     0  5e:e7:51:a5:10:55    1
You see now two Vlans with active MAC addresses. Yes they are the same in both Vlans. This is OK, since each Vlan has it’s own layer 2 forwarding table.
If the MAC entries disappear – don’t panic. This is a normal behaviour. As soon as traffic flows, they are populated again.
We have now the following setup:
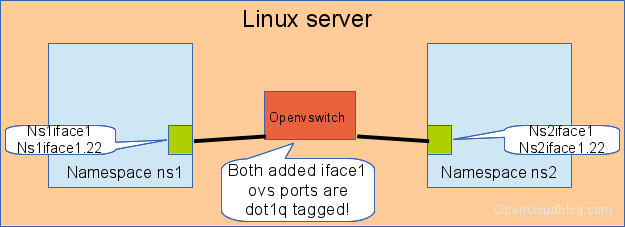
By default a port created without restrictions will transport all vlan tags
Create a untagged port
The next step is to create ports on the openvswitch for the network namespaces, which are untagged by default. This is the case in 99.9% of all cases, when you are attaching LXC or KVM instances to an openvswitch. We attach these ports to vlan 33. This is done using the commands in the Main console:
# create an internal ovs port
ovs-vsctl add-port testsw1 ns1iface2 tag=33 -- set Interface ns1iface2 type=internal
# attach it to namespace
ip link set ns1iface2 netns ns1

# create an internal ovs port
ovs-vsctl add-port testsw1 ns2iface2 tag=33 -- set Interface ns2iface2 type=internal
# attach it to namespace
ip link set ns2iface2 netns ns2
By adding „tag=33“ while using the add-port the port is by default untagged (no dot1q tags are accepted) and the port is attached to Vlan 33 on the openvswitch.
A ovs-vsctl show executed in the Main console outputs now:
    Bridge "testsw1"
        Port "ns2iface1"
            Interface "ns2iface1"
                type: internal
        Port "ns1iface2"
            tag: 33
            Interface "ns1iface2"
                type: internal
        Port "testsw1"
            Interface "testsw1"
                type: internal
        Port "ns2iface2"
            tag: 33
            Interface "ns2iface2"
                type: internal
        Port "ns1iface1"
            Interface "ns1iface1"
                type: internal
The ports ns1iface2 and ns2iface2 have now one additional line: „tag :33“. This means. The port is untagged and attached to Vlan 33. It does not mean, that only the Vlan tag 33 is accepted on a tagged link.
Next task: Bring the new interfaces up in the network namespaces, assign the ip addresses 10.2.0.1 for ns1 and 10.2.0.2 for ns2 and try to ping. Look at the MAC table on the openvswitch (from the Main console). You should see MAC addresses in Vlan 33.
We have now the following setup:
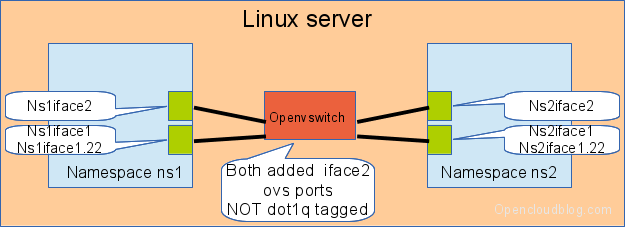
A port with tag= will be untagged on the link and will be attached to a fixed vlan on the openvswitch
Create a dot1q trunking port with a restricted vlan list
The next step is to create a new interface, which is dot1q tagged, but allows only a limited list of tags (=vlans) on the port.
The commands for the Main console are:
# create an internal ovs port
ovs-vsctl add-port testsw1 ns1iface3 trunk=44,55,66 -- set Interface ns1iface3 type=internal
# attach it to namespace
ip link set ns1iface3 netns ns1

# create an internal ovs port
ovs-vsctl add-port testsw1 ns2iface3 trunk=44,55,66 -- set Interface ns2iface3 type=internal
# attach it to namespace
ip link set ns2iface3 netns ns2
The keyword trunk tell the ovs to allow dot1q on this port. We allow the tags (=vlans) 44, 55 and 66.
The command „ovs-vsctl show“ shows now:
    Bridge "testsw1"
        Port "ns1iface3"
            trunks: [44, 55, 66]
            Interface "ns1iface3"
                type: internal
        Port "ns2iface1"
            Interface "ns2iface1"
                type: internal
        Port "ns1iface2"
            tag: 33
            Interface "ns1iface2"
                type: internal
        Port "ns2iface3"
            trunks: [44, 55, 66]
            Interface "ns2iface3"
                type: internal
        Port "testsw1"
            Interface "testsw1"
                type: internal
        Port "ns2iface2"
            tag: 33
            Interface "ns2iface2"
                type: internal
        Port "ns1iface1"
            Interface "ns1iface1"
                type: internal
The new created ports have one line stating with trunks:. This means: The port is dot1q tagged and allows the transport of the tags 44, 55 and 66. All other tags are dropped.
Check if the 3 vlans are working on the new link. Configure also Vlan 77 on the link and verify, that the traffic is dropped at the openvswitch – reason: Vlan 77 ist not allowed on the port. Configure an IP address on the native interface nsxiface3 and verify, that this traffic is also dropped.
We have now the following setup:
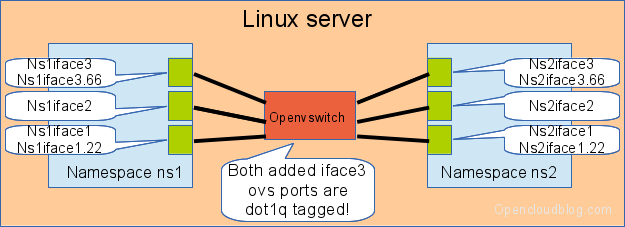
After adding a „trunking“ port with a restricted vlan list